Custom Made Parts
Please see below for our selection of custom made parts.
- 1
- 2
-
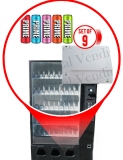
Have you wanted to try the new Prime energy drink flavors in your Dixie Narco Glass front vending machine?We have the shim kit to allow for the smaller diameter to vend properly!Without these shims, we found that the weight of a full column of cans will often give a free vend. Free vending when you aren't expecting means more service calls, less profit!Set of 9 so you can do a whole row of different flavors. -
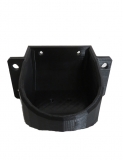
We offer our own version of the American Changer coin cup. This sale is for an American Changer plastic coin cup that fits front load and rear load changers. It is offered as a cost savings to our customers.
-
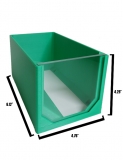
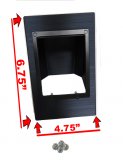
This sale is for hopper extensions. Check the first image of each size to see the dimesions.
The 6" x 4.25" x 9.075" Hopper Extender holds up an additional $600 which can be seen with a clear label.The 8" X 4.76" x 4.25" Hopper Extender hold up to an additional $300 which can be seen with a clear label.The 6.05 X 4.75 X 4.25" Hopper Extender holds up to an additional $250 which can be seen with a clear label. -
This sale is for a credit card spacer to fit on yor National Vendors Millennium 157 and 633 Coffee machine for Nayax and Cantaloupe.
-
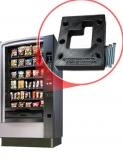
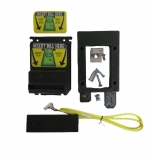
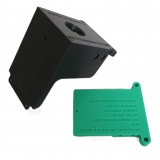
The amusement game door mounting kit is designed for games that already utilize a Mars/MEI bill acceptor and allow the addition of a Nayax or Cantaloupe card reader. The mounting kit does not require drilling into the machine door so the door is preserved. The antenna of the card reader is mounted within the bracket so no holes need to be drilled in the cabinet. Popular with Stern and Jersey Jacks pinball machines and other games that have a door that allows the full masks of the validator to protrude on the lower left-hand side of the door.
The complete mounting kit includes the following:
- Mars/MEI modified compact mask with upper edge removed and 3 pre-drilled holes
- Custom spacer - Located behind the mask and includes an opening for Nayax harnessing
- Three 8-32” pan head screws to secure the bracket in place
- Two mask decals ("Accepts $1-$5" and "Accepts $1-$20")
- Mounting bracket
- Four M35-25mm screws to mount the mask to the mounting bracket
Installation Instructions:
- Turn off the power to the game and open the door of the game.
- Disconnect power harness to Mars validator and remove the validator from the game door. Some games will have short spacers on the studs. If so, they need to be removed so the validator mask protrudes outward as far as possible when installed.
- Remove the clear cover from the rear of the Nayax mask and mount the reader to the bracket using the 4 screws provided.
- Remove the existing mask and thin spacer from the validator.
- Place the new thin spacer on the front of the validator
- Run 6 inches of the harness that connects to the Nayax reader through the hole in the thin spacer. While holding the new mask in your hand, run the harness though the opening at the top of the mask. Insert the white connector from the yellow harness into the Nayax Touch. Reinstall the clear cover.
- Insert the antenna connector into the connector on the mask. Then, place the antenna in the mounting bracket. Feed the antenna cable loop down though the opening of the mask because the cable needs to be inside of the game. This cable should not coil so there is about an 18” loop that will need to be cable tied to the existing harnessing in the game for a neat appearance in a future step.
- Mount the validator to the door of the machine and reattach the harness.
- Slide the mounting bracket with mask into the mask.
- Secure the bracket to the mask using the 3 screws provided. Close and lock the door to be sure all fits properly. Adjust if necessary.
- Place the appropriate label on the validator mask.
- Connect the telemeter by following the instructions provided by Nayax. If you are utilizing a Capital interface board kit, the instructions are included with the kit.
-
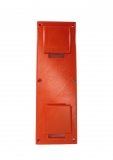
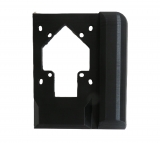
This red plate assembly fills in the openings on the front door of an AC 6000 / 6003 that are present if the coin acceptor is removed. This part keeps your changer looking attractive if you decide to remove the coin acceptor. If a new decal is installed and the changer does not have the coin acceptor, it prevents the square holes from being pressed inwards and ruining the decal.
The assembly includes 11 parts: 1 base plate, 4 fill-ins, 4 washers, and 2 screws.
-
These spacers fit in models 5591 and 5592. This spacer is used to ensure 8.4 oz Red Bull cans and other slim cans reach the delivery cup effectively. This is an updated version that is secured with screws so it does not fall out of place. This spacer does not fill in the right hand column.
-
The amusement game door mounting kit is designed for games that already utilize a Mars/MEI bill acceptor and allow the addition of a Nayax or Cantaloupe card reader. The mounting kit does not require drilling into the machine door so the door is preserved. The antenna of the card reader is mounted within the bracket so no holes need to be drilled in the cabinet. Popular with Stern and Jersey Jacks pinball machines and other games that have a door that allows the full masks of the validator to protrude on the lower left-hand side of the door.
The complete mounting kit includes the following:
- Mars/MEI modified compact mask with upper edge removed and 3 pre-drilled holes
- Custom spacer - Located behind the mask and includes an opening for Nayax harnessing
- Three 8-32” pan head screws to secure the bracket in place
- Two mask decals ("Accepts $1-$5" and "Accepts $1-$20")
- Mounting bracket
- Four M35-25mm screws to mount the mask to the mounting bracket
Installation Instructions:
- Turn off the power to the game and open the door of the game.
- Disconnect power harness to Mars validator and remove the validator from the game door. Some games will have short spacers on the studs. If so, they need to be removed so the validator mask protrudes outward as far as possible when installed.
- Remove the clear cover from the rear of the Nayax mask and mount the reader to the bracket using the 4 screws provided.
- Remove the existing mask and thin spacer from the validator.
- Place the new thin spacer on the front of the validator
- Run 6 inches of the harness that connects to the Nayax reader through the hole in the thin spacer. While holding the new mask in your hand, run the harness though the opening at the top of the mask. Insert the white connector from the yellow harness into the Nayax Touch. Reinstall the clear cover.
- Insert the antenna connector into the connector on the mask. Then, place the antenna in the mounting bracket. Feed the antenna cable loop down though the opening of the mask because the cable needs to be inside of the game. This cable should not coil so there is about an 18” loop that will need to be cable tied to the existing harnessing in the game for a neat appearance in a future step.
- Mount the validator to the door of the machine and reattach the harness.
- Slide the mounting bracket with mask into the mask.
- Secure the bracket to the mask using the 3 screws provided. Close and lock the door to be sure all fits properly. Adjust if necessary.
- Place the appropriate label on the validator mask.
- Connect the telemeter by following the instructions provided by Nayax. If you are utilizing a Capital interface board kit, the instructions are included with the kit.
-
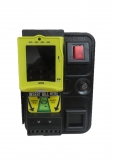
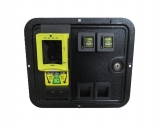
This listing is for parts found in our amusement game door mounting kit.
The amusement game door mounting kit is designed for games that already utilize a Mars/MEI bill acceptor and allow the addition of a Nayax or Cantaloupe card reader. The mounting kit does not require drilling into the machine door so the door is preserved. The antenna of the card reader is mounted within the bracket so no holes need to be drilled in the cabinet. Popular with Stern and Jersey Jacks pinball machines and other games that have a door that allows the full masks of the validator to protrude on the lower left-hand side of the door.
-
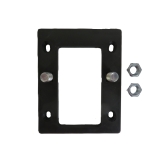
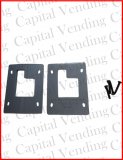
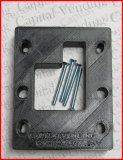
If a stand-alone credit card mask is installed below the validator on a Crane Merchant and later is removed, it will leave behind a set of holes in your pill face. Our patch plate will cover these holes so the whole pill does not need to be replaced. It also provides a stronger mounting base if a different brand of stand-alone card reader is installed.
The patch plate is held in place with double sided tape.
-
The AP 11x series card mounting kit allows a stand-alone card reader mask to be mounted directly below the validator. The benefits of this mounting method include no extension harness being required for the mask and the placement is ADA compliant.
The kit is installed as follows:
- First, use the black mounting bracket to mark the two 3/8” mounting holes. Then, drill these holes, along with a hole for the harnessing.
- Next, feed the harnessing through the hole and attached to the mask.
- Finally, mount the bracket secure it using the two-fender washer and 3/8” nuts supplied with the kit.
-
The Rowe BC11, BC12, and BC1200 mounting kit allows a stand-alone card reader mask to me mounted in the area originally occupied by the coin entry plate. The mounting kit eliminates the need for drilling.
The kit is installed as follows:
- First, remove the coin entry plate.
- Next, mount the card reader to the bracket using the four screws.
- Then, feed the harnessing through the existing rectangular slot and attached to the mask.
- Finally, mount the bracket and secure it using the two-fender washer and 3/8” nuts supplied with the kit.
-
The following part was designed to make it easy to mount the antenna(s) from a card reader in a vending machine that has the factory validator standard size knock out holes. It is for machines that will use a card reader only or have the card reader mask mounted to the validator.
Installing this part eliminates tampering with the antenna(s) mounted to the exterior of the machine. In addition, the installation is faster because you do not need to drill into the machine.
If a validator with a credit card mask is installed, it must be installed in the upper hole with the “Validator Filler Plate Antenna Mount -Allows for Easier Card Reader Installation” in the lower hole.
If a Nayax Touch or Crane Navigator is installed, the single antenna is mounted with the plate.
The newer models of Cantaloupe/USA Technology utilize two antennas with instructions that indicate the antennas should be separated from one another. However, we have tested this by placing the two antennas side by side and the reception was normal. Results may vary based on the local signal strength at your location. Based on your situation, you may need to mount one of the antennas in this mounting bracket and the second antenna externally.
-
 Only 5 left in stock
 -
-
New!
-
-
The credit card reader mask mount for curved panel is a must-have for any vending machine owner who wants to accept credit cards. This mount allows you to install a stand-alone credit card reader mask onto the curved surface of your Dixie Narco Bev Max or a Vendo / Dixie Narco Pepsi HVV stack vendor, so you can start accepting payments without cash.
The mount is compatible with Nayax Touch or Cantaloupe/USA Technology masks. It is also easy to install with just four screws. The mount comes with instructions on how to install it, and it includes a YouTube video that shows you how to do it.
If you are looking for a way to accept credit cards in your Dixie Narco Bev Max or Vendo / Dixie Narco Pepsi HVV stack vendor, then the Credit Card Reader Mask Mount for Curved Panel is the perfect solution for you. Order your mount today and start accepting credit cards!
Features
- Allows you to install a stand-alone credit card reader mask onto the curved surface of your Dixie Narco Bev Max or a Vendo / Dixie Narco Pepsi HVV stack vendor
- Compatible with Nayax Touch or Cantaloupe USA Technologies masks
- Easy to install, with just four screws
- Includes instructions and a YouTube video on how to install it
Benefits
- Accept credit cards in your Dixie Narco Bev Max or Vendo / Dixie Narco Pepsi HVV stack vendor
- Reduce the risk of cash theft
- Improve customer satisfaction
- Simplify operations
-
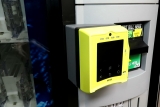
This sale is for a validator vault for bill box of Pyramid bill acceptor.
-
This sale is for a validator vault for Mars Series 2000 and Talos bill acceptor.
-
This sale is for a ADA mount that fits Nayax and Cantaloupe/USA Technologies card readers. Includes 4 screws.
-
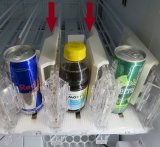
Used for 8.4 oz and 12 oz slim cans (Red Bull) with a typical diameter of 2.2". Works with other beverages with slim 2.2" diameter.
Offered is a new version that is easier to install. Fits Dixie Narco BevMax soda machines.
-
-
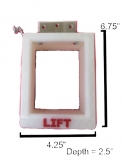
Check the image for the dimensions.
-
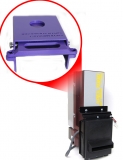
The 3D mask is there to provide an alternative to the regular compact mask due to a current shortage. This product is not designed for outdoor use.
Popular application are Rowe bill changer kits and Touch Tunes jukeboxes.
-
This custom designed mask allows for a Mars/MEI validator to be installed into American Changer bill changers that have a narrow opening. It fits Talos and series 2000. It is commonly installed to replace Coinco, Pyramid, and Astro bill validators.
This version mask if for Mars valdiators that accept US currency - another version is offered for wider Canadian currency.
This product is not designed for outdoor use.
-
Transform your Dixie Narco BevMax vending machine into a versatile payment system with these Credit Card Reader Spacer Kits. This kit simplifies the installation of a credit card reader, opening the door to convenient cashless payments.
Compatible with Nayax standard VPOS and Touch readers, Cantaloupe card readers, and Castles Technology, these spacer kits are a valuable addition to your vending machine setup. Make the switch to cashless convenience with one of our spacer kit today.
-
This sale if for a designed upper coin entry coin to fix a CF7512 coin changer. Check photos to confirm this is what you need
This part is designed to fix a broken coin chute on a CF7512 changer.
-

This sale is for a Conlux changer lower brace.
This part is to help support the lower part of the Conlux tube.
-
This aftermarket part will replace your cracked or otherwise damaged Asahi Sekio NH-1 hopper extension.
-
Secure your credit card mask with our Top Mount Enclosure for Credit Card Mask. This essential component ensures your credit card reader remains firmly in place, providing consistent, reliable service for your customers. It's an indispensable part of any vending machine setup.
Invest in the Top Mount Enclosure for Credit Card Mask to guarantee secure, reliable transactions every time.
-
This is an easy to install clip on part that helps containers land upright properly in a picker cup.This aids in maximizing the efficiency of the machine when dealing with the ever changing sizes and dimensions of drink containers.Please see photos for fitment in BevMax. This listing is for one padded extension.


- 1
- 2